Installation instructions
Modern Windows operating systems offer greater protection from viruses than previous versions, unfortunately this also means than other legitimate programs (like Class Maker) are prevented from installing. By following the steps below, you can install Class Maker on your computer.
Install with Administrator access.
Firstly, please ensure you run the installer program in Administrator mode. To do this, you need to extract the files in the "Class Maker 2016.zip" file to a new folder. In Windows Explorer, right click on the zip file, and press "Extract All". Choose a folder and press the "Extract" button.
Next, you will to run the "setup.exe" file in your newly created folder. Right click on "setup.exe" and click the button marked "Run as Administrator". You may need to enter the Administrator username and password which you will need to find from your system administrator.
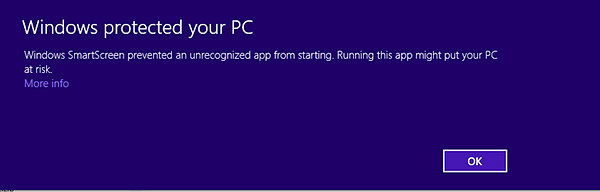
You may then get a window pop up which looks something like this (depending upon your version of Windows).
Click the "More info" button to get to the next screen, then click the "Run anyway" button.
The installer will then put Class Maker into the folder you specify, which is "C:\Class Maker" by default.
Copy your licence file into this folder to upgrade from the demo version.
The first time you run Class Maker, you may need to run it in Administrator mode. Right click on "Class Maker.exe" and select "Run as Administrator". Once you have run it as an administrator once, you shouldn't need to do it again.
If you have any problems with installing Class Maker, please email the developers at
Thanks.